

Every fashionista dreams of having a shoe closet filled with Christian Louboutins. Having a pair of these iconic red bottomed shoes is right up there with buying your first Chanel bag. But let’s face it. They’re ridiculously expensive. (Both the Louboutins and the Chanel.)
So while we may not all be able to afford red-bottoms on our feet, we can certainly get the look on our nails. Here’s how.
![]()
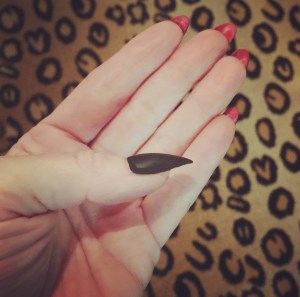
Step 1: Get the right nail length.
![]()
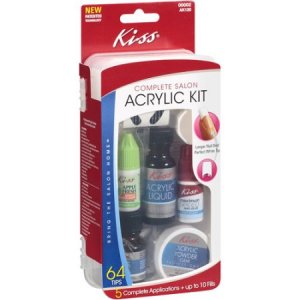 Because you need to paint the underside of your nails, this look only works on longer nail lengths.
If your nails are short, consider using pop-on nails that you can paint over or do what I did and purchase the Kiss Complete Salon Acrylic Kit. It comes with various sizes of nail tips and it’s actually pretty easy to use.
This manicure also looks best on round, somewhat pointy nails, so make sure you file your nails into the appropriate shape.
![]()
Step 2: Paint the underside of your nails red.
![]()

![]()
Any bright red nail polish color will do. I used Nails Inc Gel Effect polish in Covent Garden.
Use a very light touch when painting the underside because you don’t want it to pool up under your nail.
You may even want to use a different type of brush, such as an eyeliner or eyeshadow brush with a finer tip for better precision.
![]()
Step 3: Apply two very light coats of black nail polish.
![]()
 I chose Essie’s Licorice nail polish for this step.
Start with a base coat of clear nail polish before applying the black color so you don’t stain your nails. Then apply a very light coat of black polish and let it dry. Apply a second coat and give that one plenty of time to dry as well.
The key to making this manicure look perfect is patience. You have to let each coat dry completely before applying the next step. I waited an hour before moving on to the matte topcoat.
Step 4: Add a matte top coat.
![]()
 The final step is applying the matte top coat. I love Sally Hansen’s Big Matte Top Coat for this look.
It is very important to make sure you cover the whole entire nail surface with the topcoat. Otherwise, you’ll get patches of shine that will ruin the overall effect. And you don’t want to apply more than one coat of the matte polish because it will look too thick.
You’ll also want to apply the matte coat to the underside of your nails, so that the matte red will match nicely with the matte black.![]()
Voila! Now take the money you saved from having a manicure done at the salon and put it into your “Red Bottom Shoe Fund.” You’re one step closer to stepping out in style!

You must be logged in to post a comment.